
How to Deploy an AI Agent to Shopify
Quickly add an AI chatbot to your Shopify store by creating an AgentX agent, copying the embed code, and pasting it into a Custom Liquid section—boosting customer engagement and automating support in minutes.
Want to add a powerful AI chatbot to your Shopify store? With AgentX, you can quickly deploy an AI agent that boosts engagement, automates support, and delivers a modern shopping experience. Here’s how to get started:
So How to Deploy an AI Agent to Shopify
Step 1: Create Your AI Agent with AgentX 🤖
Before you add a chatbot to WordPress, you need to build your AI agent:
Visit AgentX’s Beginner’s Guide.
Follow the steps to set up your AI agent, customize responses, and configure basic settings.
Already have an agent? Skip to Step 2!
Step 2: Configure Deployment & Copy the Embed Code 📝
On AgentX, go to the Deploy section:
Enable Website Embedding: Toggle “Enable” for Website Embedding.
Customize the Chat Widget:
Style: Choose between Floating or Inline chat.
Floating Position: Left, center, or right on your page.
Floating Icon Size: Adjust to fit your site design.
Style Set: Pick Rounded, Square, or Classic look.
Color Theme: Match your website’s color palette.
Rebranding (Pro feature): Upgrade to Pro for white-label & custom branding options. See pricing
Authorized Domains: For extra security, add your website (e.g., https://yourdomain.com) to restrict the agent to specific domains (optional, but recommended).
Chat File Upload: By default, uploaded files are analyzed by the agent. Enable “File Upload as Attachment” if you want users to send files (like print-ready images or documents) as direct attachments, not processed by the AI.
Most important:
Find the unique JavaScript embed code under “Embed,” and click Copy.
Note: If you use Next.js and have issues, select “Next.js Embedding.”
Step 3: Remove Pre-Installed Chatbots (if any)
Check your Shopify apps and theme for any existing chatbots.
Remove them to prevent conflicts or duplicate chat widgets.
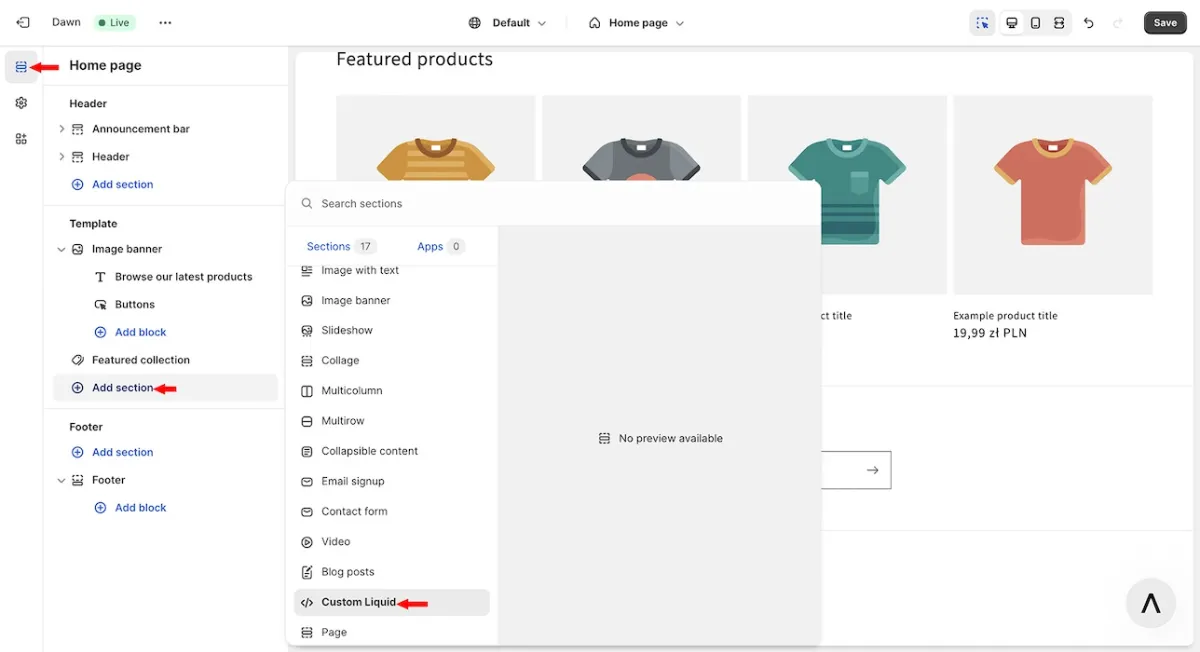
Step 4: Add a Custom Section in Shopify
In your Shopify admin, go to Sales channels → Online Store → Themes → Customize.
From the left menu, select Sections, then click Add section.
Choose “</> Custom Liquid” to create a space for your agent code.
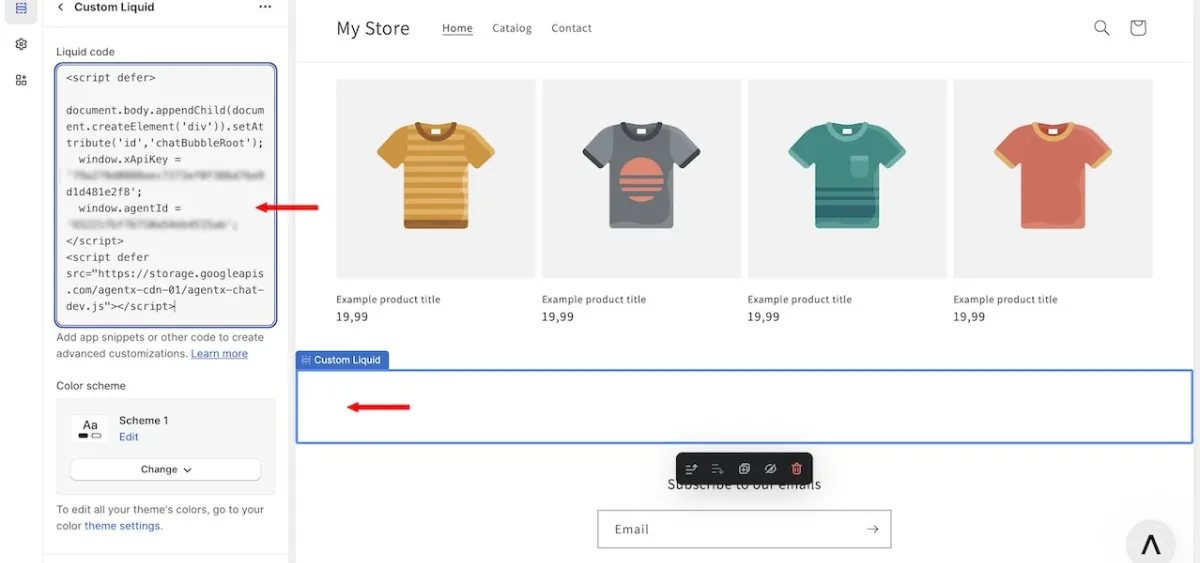
Step 5: Paste the Copied JavaScript Code
In the new Custom Liquid section, paste your copied JavaScript code.
Save your changes.
Step 6: See Your Agent Live! 😍
Visit your Shopify store to watch your AI agent chatbot in action.
Your site is now equipped with 24/7 AI-powered customer engagement.
Why integrate AgentX with Shopify?
Adding an AI chatbot helps automate support, increase conversions, personalize the shopping experience, and provide instant answers - day or night!
Need help?
Contact the AgentX support team for onboarding assistance!
More
Check out more tutorials to find how to deploy to website builders, such as:
