

AGENTX FEATURES
🚀 Introducing Multi-workspace in AgentX

A smarter way to organize, collaborate, and scale.
We’re excited to roll out the Multi-workspace feature - a powerful upgrade that lets you manage your AI agents and teams with precision and flexibility. Whether you're building for clients, multiple products, or just want a clean setup across different projects, Multi-workspace makes it effortless.
✨ Why You’ll Love It – Key Highlights
Multi-workspace lets you create separate workspaces under one AgentX account. Each workspace holds its own agents, users, and settings-so you can keep things organized without juggling multiple logins.
Now you can:
🗂 Organize Agents with Workspaces
Keep agents separated by project, client, or use case. Clean, simple, and scalable.
📌 Example: A digital agency builds bots for five different clients. Each client gets their own workspace, with no overlap in agents or data.
🔄 Switch Between Workspaces Instantly
Jump between workspaces from one account without logging out or duplicating tabs.
📌 Example: You're managing projects for two different companies and also running a personal side project. With Multi-workspace, you can seamlessly switch between all three - no need for multiple logins or messy browser sessions.
👥 Invite Users to Specific Workspaces Only
Add clients, teammates, or collaborators to the workspace they need - not your entire account.
📌 Example: A client gets access only to their own workspace, without seeing other client projects or internal tools.
🛡 Custom Permissions Per User
Limit what users can see or do - like giving a client access to their agent’s chat history, but not edit rights.
📌 Example: A marketing analyst is added as a Viewer to monitor how users interact with a lead-gen bot, without the risk of changes.
📦 Transfer Agents to Other Users
Built a bot for a client? Transfer the entire agent - data, setup, history, and files - with just a few clicks.
📌 Example: After launching a bot MVP, a freelancer transfers full ownership to the client’s team for continued use and control.
💼 Add Multiple Seats & Assign Freely
Add users to your account and assign them to any workspace. Total team flexibility.
📌 Example: A user on the PRO plan is happy with their current setup but needs 2 extra seats temporarily for a short-term project. Instead of upgrading the whole plan, they simply add the extra seats, use them as needed, and scale back later. No fuss, no overcommitting.
🆕 How to Create Your First Workspace
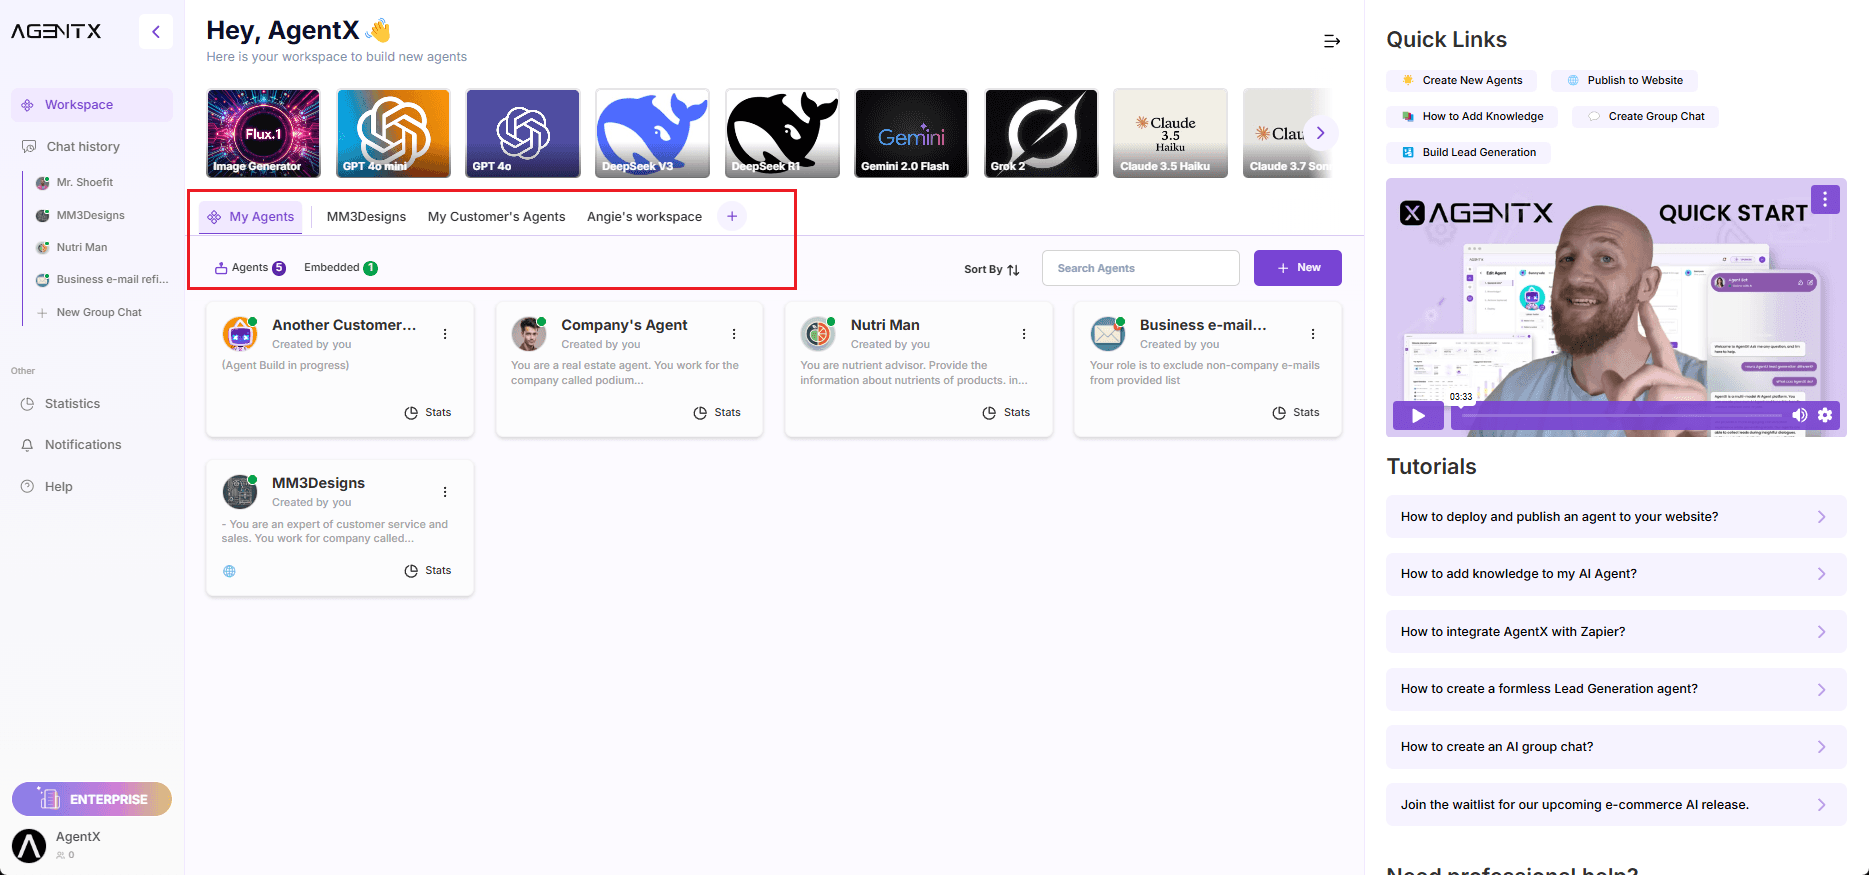
Welcome to the new and improved Workspace page - your central hub for everything AgentX. From here, you can easily access your agents, chat history, base models, and switch between different workspaces with just a click.
To get started:
Head to the “My Agents” tab - this is where you’ll see all agents currently in your account.
Click the “+” icon to create a new workspace
Give it a name - and that’s it! Your new workspace is ready to go.
Now it’s time to add agents, invite teammates, and make it your own.
🤖 How to Add an Agent to a Workspace
There are two easy ways to add agents to a workspace—whether you're starting from scratch or organizing existing ones:
1. Create an Agent Directly on Workspace
If your workspace is empty, you’ll see a “Create an Agent” field right on the screen. You can also click the “+ New” button and select “Create Agent.”
Once created, your new agent will be automatically assigned to the current workspace. Simple and seamless.

2. Move an Agent from Another Workspace
Already have agents in your account? You can move any of them to a different workspace:
Click on “...” next to the agent that you want to move,
Select “Move Agent”,
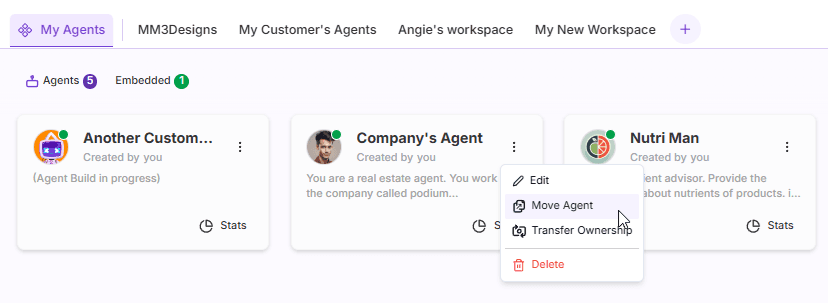
Choose the target workspace - and you’re done!
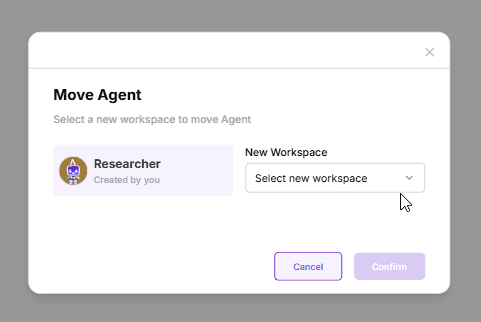
💡 Note: All your agents will always be visible under the “My Agents” tab. This is your personal overview and isn’t shared with anyone else.
If you want to move an agent to a workspace that belongs to someone else (even if you're part of it), you'll need to transfer the agent to their account. We'll explain how that works later in this guide.
👥 How to Add a Teammate to Your Workspace
AgentX gives you full control over team collaboration. You can easily add users to your account and assign them to any workspace - offering total flexibility for how your team operates.
Depending on your current plan, your account may include a number of team seats. Need more? No problem - just purchase additional seats to scale with your company’s needs.
TIP: Each seat only counts once toward your account. That means a single user can be part of as many workspaces as you like, without using up extra seats!
➕ Adding the user to workspace.
To add the user, click ⚙️ next to selected Workspace and Select “+ Invite member”.
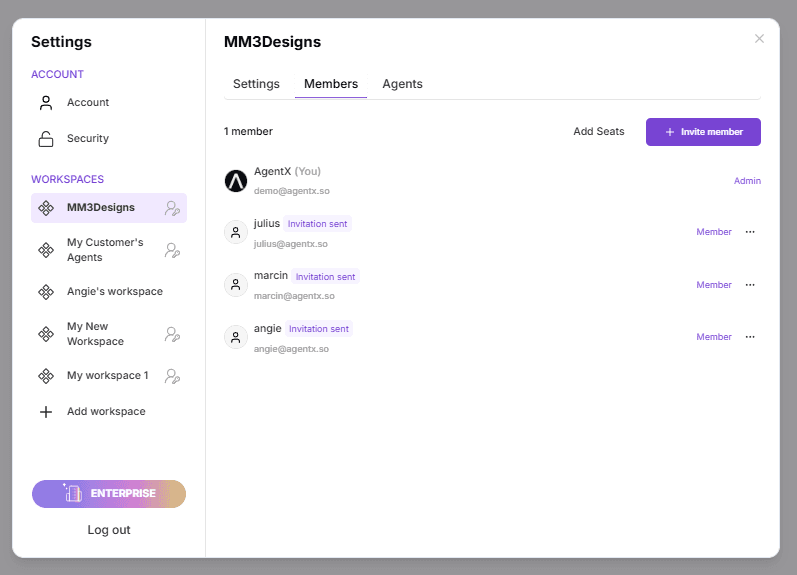
Provide e-mail addresses of users that you want to add.
💡 Heads up: When you invite a user to a workspace, they’ll receive a notification and an email to accept the invitation.
Changed your mind? No problem - just click the “...” menu next to the pending invite and select “Delete” to cancel it anytime.
🔐 How to Set User Permissions
Once your workspace, agents, and team are in place, the next step is setting the right permissions for each teammate. AgentX gives you full control over who can view, use, or manage your agents by offering three distinct permission levels:
👁 Viewer
Access: Statistics tab & conversation history
Viewers can see the conversations your agent has handled and review any leads generated - but they can't edit or interact with the agent in any way.
Perfect for teammates focused on analyzing agent performance, like marketing analysts, data reviewers, or client success roles.
💬 Member
Access: Everything a Viewer can do, plus interact with the agent
Members can test the agent or use it in real-world scenarios while also accessing analytics and history.
Ideal for those who work with the agent directly, like sales reps, support agents, or product testers.
🛠 Editor
Access: Full control
Editors have full editing rights - they can modify the agent's content, logic, data sources, and settings.
Assign this role to trusted team members responsible for building, maintaining, or fine-tuning agents.
👑 Admin (Workspace Owner)
The Admin is the creator and owner of the workspace. This role cannot be transferred or assigned manually. Only the owner has full control over the workspace itself, including deleting it or transferring ownership.
One workspace = one Admin. Make sure it's someone you trust.
💡 You can assign different roles per workspace, ensuring the right people have the right access - no more, no less.
📤 Moving an Agent Outside Your Account
Sometimes, you may want to transfer an agent to someone else—like handing over a finished bot to a client. When you transfer an agent, everything goes with it:
its knowledge base, documents, website integrations, settings, and usage limits will move to the recipient’s account.
🔁 How to Transfer Agent to another account
Click the “...” next to the agent you want to transfer
Select “Transfer Ownership”
Enter the recipient’s email address
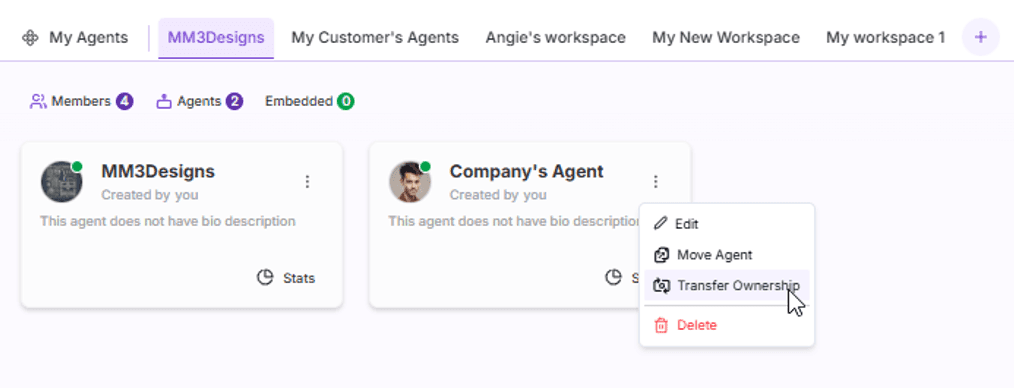
⚠️ Note: The agent remains in your ownership until the recipient accepts the transfer.
Important Things to Know
If the recipient's account doesn’t support the features or data size of the agent (e.g., file limits, connected sites, premium features),
they won’t be able to accept the transfer.In such cases, the recipient will be notified, and you’ll both need to decide whether to: Reduce the size or features of the agent before retrying, or the recipient can upgrade their plan to match the agent’s requirements
Try Multi-workspace today!
Organize your agents like a pro.
No tech skills needed.

Try it now or

Share Blog
Related blogs